Conditional Image Layouts in Hugo
July 20, 2023
Introduction
In this tutorial, I describe how to write conditional image layouts using Go and HTML for a Hugo site.
When I started designing Little Ghost, my Hugo theme, I wanted to conditionally insert featured images based on parameters called in a page’s front matter and the site configuration file. Hugo’s figure shortcode was an option, but I wanted something more automatic. I learned how easy this can be in Hugo.
Part 1: Featured Images for Pages (Basic)
There were several criteria I wanted in to implement for featured image layouts. I wanted Hugo to:
- Check the page’s front matter for a featured image.
- Pull a declared featured image into the layout as a resource.
- Allow the user to include alt text for the image within the front matter.
Finally, I wanted this to be optional. If no front matter is declared, no HTML should be rendered for the image layout.
Building the Featured Image Layout
First, let’s look at the code/markup. I’ll explain each line below.
{{ if isset .Params "featured_image" }}

{{ $image := .Resources.GetMatch .Params.featured_image }}

<img
    {{ with $image }}src="{{$image.RelPermalink }}"{{end}}
    alt="{{ .Params.featured_alt }}"
/>

{{ end }}
So, what is each line doing here?
First, we ask Hugo to check whether a featured_image is set in the front matter. If not, everything else will be ignored:
{{ if isset .Params "featured_image" }}
Assuming we have declared a featured image, we then want to access it as a page resource. This is important because, as described in the Hugo documentation, page resource files get a page-relative URL, which simplifies the front matter we need to write. We will also see that getting our image as a page resource will let us make creative use of Hugo’s image-processing methods.
So, what we want to do is:
- Get
featured_image. - Ensure that we are acessing it as a page resource.
- Store the image as a variable that we can use in our page layout.
The next line accomplishes all three of these tasks:
{{ $image := .Resources.GetMatch .Params.featured_image }}
We now have our image as a resource, but we haven’t created its display. Let’s create create an <img> layout that calls in the resource.
First, we’ll open (and leave open) the image tag:
<img
Then, like any image tag, we need to include the source for the file. This is easy, since we’ve called the image as a resource and assigned it to a variable: we just need to add .RelPermalink to get the URL.
The only slight twist is that we need to set the scope for the image’s source permalink carefully so that we can also declare the alt text using a separate front matter parameter. We will include {{ with }} ... {{ end }} around only the src line and close the image tag afterward:
<img
    {{ with $image }}src="{{$image.RelPermalink }}"{{end}}
/>
Now, let’s also include set up alt text for our image, which can be declared using the featured_alt parameter in the front matter:
alt="{{ .Params.featured_alt }}"
Finally, we just need to close the conditional statement we started at the beginning of the block with {{ end }}. Here’s the whole block again:
{{ if isset .Params "featured_image" }}

{{ $image := .Resources.GetMatch .Params.featured_image }}
<img
    {{ with $image }}src="{{$image.RelPermalink }}"{{end}}
    alt="{{ .Params.featured_alt }}"
/>

{{ end }}
Once you’ve written this into your page layout file, all you’ll ever have to do is include the following two lines in your page front matter:
---
featured_image: image.jpg
featured_alt: "Your alt text."
---
It’s that easy!
Conditional Images and Image Processing in List Pages
We can also expand the basic layout and front matter parameters we created to write a dynamic and intelligent image layout for a list page. This page will range over relevant content and return an optimized featured image. A good example of (actually the best example, since we’ll be recreating a small part of it) is the Posts page for this website.
The Full Markup / Code
First, let’s look at the markup / code for a full grid layout of blog posts. Ignore the Tailwind CSS classes, which are irrelevant.
{{ range (.Paginate ( .Pages.ByDate.Reverse )).Pages }}

      <article class="p-6 shadow-lg flex flex-col">

        {{ if isset .Params "featured_image" }}

          {{ $image := .Resources.GetMatch .Params.featured_image }}
          <a href="{{ .RelPermalink }}">
            <img
                {{ with $image }}src="{{ (($image.Crop "1200x800").Resize "600x").RelPermalink }}"{{ end }}
                alt="{{ .Params.featured_alt }}"/>
          </a>

        {{ else }}

        {{ $image := resources.Get .Site.Params.post_image }}

          <a href="{{ .RelPermalink }}">
            <img
                {{ with $image }}src="{{ (($image.Crop "1200x800").Resize "60x").RelPermalink }}" {{ end }}
                alt="{{ .Site.Params.post_image_alt }}"
            />
        </a>

        {{ end }}

        <div class="grow">

          <h3 class="font-bold text-xl mt-2"><a href="{{ .RelPermalink }}">{{ .Title }}</a></h3>

          <p class="mb-4">{{ .Params.summary }}</p>

        </div>

        <div>

          <a href="{{ .RelPermalink }}" class="p-2 rounded-lg bg-indigo-600 text-white">Read More</a>

        </div>

      </article>

  {{ end }}
To summarize: this code block creates a layout where Hugo will range over every relevant page and, for each one, produce a grid item containing:
- a featured image,
- a summary,
- and a “Read More” button.
The main thing you need to understand is that all of this is surrounded by:
{{ range (.Paginate ( .Pages.ByDate.Reverse )).Pages }}

    ...

{{{ end }}}
What this code broadly states (beyond some pagination information) is that Hugo is going to range over every relevant page and create whatever is included between the tags.
Back to the Images
So, back to our focus: the featured image. We could simply copy the image layout we created above. But we want something beyond the basics. Specifically:
- We want all these images to be the same size, automatically, so that they look nice together.
- We want a way to increase page load time. This is going to be a lot of images loading on a single list page.
- We want a backup image even if a page doesn’t have a featured image assigned. A single page without a featured image is fine, but inconsistency on a list page never looks great.
- We don’t want to write any extra front matter beyond what we’ve included for the single layout above.
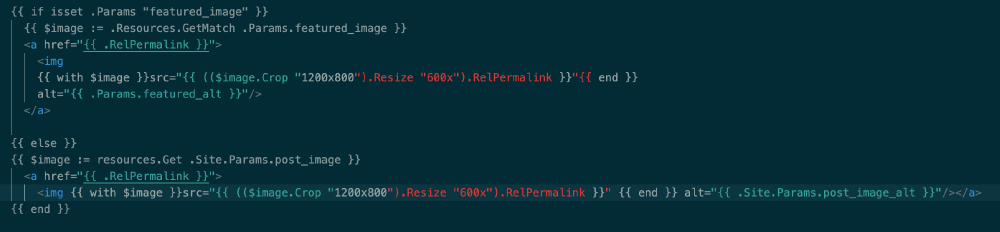
This is all surprisingly simple. Let’s take a closer look at the image-related part of the markup / code above:
{{ if isset .Params "featured_image" }}

    {{ $image := .Resources.GetMatch .Params.featured_image }}

    <a href="{{ .RelPermalink }}">
        <img
            {{ with $image }}src="{{ (($image.Crop "1200x800").Resize "600x").RelPermalink }}"{{ end }}
            alt="{{ .Params.featured_alt }}"
        />
    </a>

{{ else }}

    {{ $image := resources.Get .Site.Params.post_image }}

    <a href="{{ .RelPermalink }}">
        <img
            {{ with $image }}src="{{ (($image.Crop "1200x800").Resize "600x").RelPermalink }}" {{ end }}
            alt="{{ .Site.Params.post_image_alt }}"
        />
    </a>

{{ end }}
Much of this should hopefully look familiar to you now. To summarize the first half of the block:
- We’re checking to see if a featured image has been set. If it has, we call it as a resource into a variable.
- We’re now surrounding the image with an
<a href="{{ .RelPermalink }}"></a>tag so that clicking the image takes us to the page itself. Note that how we are still in the page scope, so.RelPermalinkis returning the link to the page, not the image. - We’re including the image source and the correct scope using
{{ with $image }}{{ end }}. - We’re getting the alt text from the front matter and inserting it into the HTML.
Now let’s look at the second half, which starts at the {{ else }} line:
{{ else }}

    {{ $image := resources.Get .Site.Params.post_image }}

    <a href="{{ .RelPermalink }}">
        <img
            {{ with $image }}src="{{ (($image.Crop "1200x800").Resize "60x").RelPermalink }}" {{ end }}
            alt="{{ .Site.Params.post_image_alt }}"
        />
    </a>

{{ end }}
Note that we’re calling something different into our variable here: .Site.Params.post_image. What this block is saying is that if a featured_image hasn’t been called on a page, Hugo should go get a default image declared in your configuration file title post_image. Again, you can include also define the alt text there as post_image_alt. In your config file, it would look like this:
post_image = 'images/image.png'
post_image_alt = 'Alt text.'
Note that I’m using a config.toml file, so the specific syntax might vary since Hugo allows for YAML, TOML, or JSON. This won’t have any effect on the layouts we’ve created.
Processing Our Images
We’re in the home stretch now. There’s one small piece that we haven’t talked about, but it’s doing some essential work. Note the methods we’ve added when calling our image:
{{ (($image.Crop "1200x800").Resize "600x").RelPermalink }}
We’re using some of Hugo’s image-processing methods here.
- Because we wanted equally sized images, we employ the
.Cropmethod to first take our image and crop it to 1200x800. - Because the image will be used in a grid layout where it will be smaller, we then resize our cropped image to half size using the
Resizemethod. This will help with page load time. - Finally, we’re returning the permalink for the now-processed image. You can and should tweak the crop size and the resize to your liking.
Conclusion
Once you’ve set up these layouts, the only thing you will ever have to write is:
- The
featured_imageandfeatured_altparameters in your page front matter. - The default
post_imageandpost_image_altin your config file as a fallback.
Hopefully, this helped you learn something about using creating image layouts in Hugo. You can focus entirely on your content and let Hugo and your layouts do the work for you.
Next Steps
If you’ve got this down and want to do more with what you’ve learned, here are two small project ideas:
- Rewrite the
<img></img>layouts using<figure></figure>tags. See if you can add an optional parameter forfigcaptions. - Look over some of the other image processing methods that Hugo ships with. What other ones might you include?
An Easier Solution
Finally, if you just want a simple and flexible Hugo theme that does all of this for you, check out Little Ghost.